


Ordering the wrong number of roof tiles is one of the most expensive — and most avoidable — mistakes in a roofing project. Order too few, and you risk your reorder arriving in a different color batch, leaving a visible mismatch across your roof. Order too many, and you’ve paid for material, storage, and freight you’ll never use.
At Asiasn Roof, our technical team has walked hundreds of homeowners, builders, and contractors through this exact calculation — and the truth is, most online tile calculators skip the details that actually matter: your roof’s real shape, your local climate, and how your chosen tile material behaves once it’s on the roof.
This guide gives you the complete, accurate method — the same one our roofing experts use — so you can order the right quantity the first time.
What You'll Learn in This Guide
By the end of this article, you’ll know how to:
- Measure your roof correctly (not just your house footprint)
- Adjust your calculation for roof pitch
- Find the right tile coverage rate for your chosen material
- Add the correct wastage percentage for your roof’s complexity
- Calculate ridge, hip, and edge tiles separately
- Avoid the costly mistakes that lead to reorders, batch mismatches, and freight surcharges
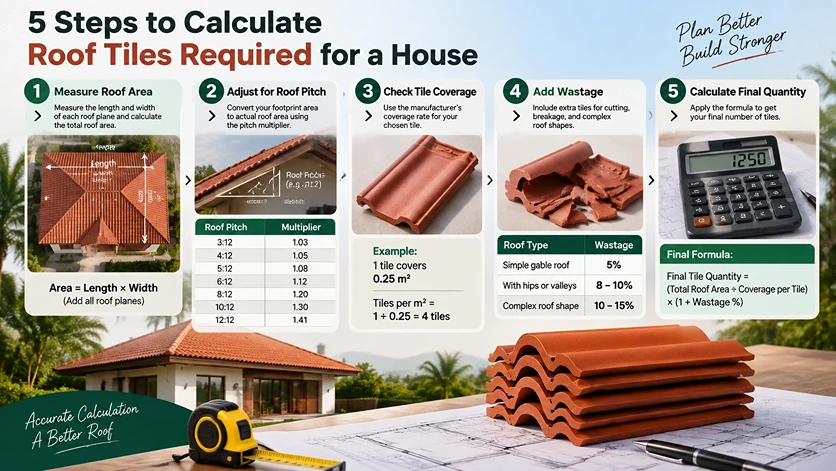
Step 1: Measure Your Roof Area (Not Your House Footprint)
Your roof surface is always larger than the floor area of your house, because roofs are sloped. This is the single most common source of under-ordering.
How to measure:
- Measure the length and width of each roof plane (each sloped section, sometimes called a “roof face”).
- Multiply length × width to get that plane’s area.
- Add up every plane for your total roof area.
For triangular sections, like gable ends, use: Area = (Base × Height) ÷ 2
Measure at the actual roof surface, including overhangs — not just the wall-to-wall footprint of the house. Homeowners frequently forget overhangs, which can undercount total area by 5–8%.
Step 2: Adjust for Roof Pitch
need to convert that flat number into actual sloped roof area. This is because a steeper roof has more surface area than a flat one covering the same ground space.
Pitch is the steepness of your roof, usually written as a ratio like 6:12 (6 inches of rise for every 12 inches of horizontal run).
Roof Pitch | Multiplier |
3:12 (low slope) | 1.03 |
4:12 | 1.05 |
5:12 | 1.08 |
6:12 (standard) | 1.12 |
8:12 | 1.20 |
10:12 (steep) | 1.30 |
12:12 | 1.41 |
Formula: Actual Roof Area = Footprint Area × Pitch Multiplier
In heavy-rainfall regions — Kerala is a good example — installers often use a steeper pitch and increase headlap (the overlap between two rows of tiles that stops water from being pushed backward under the tiles by wind-driven rain). More headlap means each tile effectively covers less area, so your final tile count goes up. If you’re roofing in a high-rainfall zone, ask your supplier whether a “high-exposure” coverage rate applies to your project rather than using the standard figure.
Step 3: Find Your Tile's Coverage Rate
Coverage rate is simply the amount of roof area one tile covers once it’s installed and overlapping with the tiles around it. It depends on:
- The tile’s size and shape
- How much overlap the manufacturer specifies
- Batten spacing (the horizontal wooden or metal strips tiles are fixed to)
Asiasn Roof provides an exact coverage rate for every tile product we sell, so this step is a lookup, not a guess.
Formula: Number of Tiles = Total Roof Area ÷ Coverage Area per Tile
Step 4: Add a Wastage Allowance
Even a perfect measurement needs a buffer, because tiles get cut for edges and corners, and some break during handling and transport. This is called your wastage allowance.
Roof Type | Recommended Wastage |
Simple gable roof, no valleys | 5% |
Roof with hips, valleys, or dormers | 8–10% |
Complex or irregular roof shape | 10–15% |
Formula: Final Tile Quantity = Number of Tiles × (1 + Wastage %)
Don’t default to the low end of the range just to save money upfront. A shortfall of even 20–30 tiles can trigger a minimum-order fee and a separate freight delivery that costs more than the tiles themselves — see the cost section below.
Step 5: Calculate Ridge, Hip, and Verge Tiles Separately
Ridge tiles (along the roof peak), hip tiles (along sloped corner joints), and verge tiles (along gable edges) are not part of your main field tile count. They’re calculated from linear length, not area:
- Ridge tiles = total ridge length ÷ coverage length per ridge tile
- Hip tiles = total hip length ÷ coverage length per hip tile
- Verge tiles = gable edge length ÷ coverage length per verge tile
Always list these separately on your order. Assuming your wastage buffer “covers” trim tiles is one of the most common reasons contractors run short mid-project.
How to Calculate Roof Tiles for a House
Let’s walk through a simple, real example using easy numbers.
Your house:
- Roof footprint: 100 square meters
- Roof pitch: 6:12 (multiplier 1.12)
- Tile coverage rate: 0.25 square meters per tile
- Roof complexity: moderate (a couple of hips, no major dormers) → 8% wastage
Calculation:
Step | Calculation | Result |
1. Actual roof area | 100 × 1.12 | 112 m² |
2. Base tile count | 112 ÷ 0.25 | 448 tiles |
3. Final quantity with wastage | 448 × 1.08 | 484 tiles |
So for this house, you’d order 484 field tiles, plus ridge, hip, and verge tiles calculated separately from your roof’s linear measurements. That’s it — the same five steps, just applied to real numbers.
Do Different Tile Materials Change the Calculation?
Yes. The tile material you choose affects both your coverage rate and how much wastage you should realistically plan for.
| Material | Coverage Behavior | Wastage Notes |
|---|---|---|
| Clay | Consistent sizing, moderate coverage per tile | More prone to chipping in transit and cutting; color can vary between kiln batches |
| Concrete | Often larger format, fewer tiles per m² | Generally more impact-resistant; lowest risk of color batch variation |
| Slate | Coverage varies by size grade, since bundles are often mixed widths | Needs the most conservative wastage allowance due to natural material variability |
| Composite | Manufactured to tight, consistent tolerances | Lowest typical wastage — clean cuts, low breakage |
If cost comparison is close between two materials, factor in wastage, not just the sticker price per tile. A material with higher expected wastage effectively costs more per square meter than the list price suggests.
Common Mistakes That Increase Roofing Costs
After years of reviewing takeoffs and fielding reorder calls, these are the mistakes we see most often:
Homeowner mistakes:
- Calculating from the house footprint and forgetting the pitch adjustment entirely
- Using a generic online coverage rate instead of the manufacturer’s figure for the exact tile chosen
- Not budgeting extra wastage around skylights, chimneys, or multiple dormers
Contractor and builder mistakes:
- Blending an average pitch across a roof with multiple slopes (common on mansard or L-shaped roofs), which understates the steeper sections
- Treating ridge, hip, and verge tiles as “covered” by the general wastage buffer instead of calculating them separately
- Underestimating wastage on valley cuts, which consume tiles at an angle and generate more unusable offcuts than a straight hip cut
Why ordering a small buffer of extra tiles matters: Tiles are manufactured in production batches, and subtle color or texture differences between batches are normal. If you run short and need a reorder — even months later — there’s no guarantee the new batch will match. Ordering your full quantity, including wastage, from a single batch upfront is the most reliable way to avoid a visible seam on your finished roof.
Transportation damage is also a real factor: tiles can chip or crack in transit, especially brittle materials like clay and slate. Your wastage allowance should account for this, not just on-site cutting.
When Should You Ask a Roofing Expert Instead of Calculating It Yourself?
The formulas in this guide will get you very close for a straightforward roof. But it’s worth getting a professional takeoff if your project involves:
- Multiple roof shapes combined (e.g., a mansard section plus dormers)
- Several skylights, chimneys, or roof penetrations
- A climate zone with heavy rainfall or high wind exposure
- Any uncertainty about which coverage rate applies to your specific tile choice
A five-minute conversation with a technical estimator can save you from a reorder that costs more in freight and delay than the original tiles.
Frequently Asked Questions
❓How do I measure roof pitch without the original building plans?
Use a level and tape measure to find the vertical rise over a fixed 12-inch horizontal run — this is easiest to do along a rafter inside the attic. That gives you your pitch ratio (e.g., 6:12), which you match to the multiplier table above.
❓What's a safe average wastage percentage if I'm unsure about my roof's complexity?
8% is a reasonable default for a roof with some complexity but no major irregularities. Use 5% only for a simple gable roof with no valleys, and go up to 10–15% for roofs with multiple dormers, skylights, or unusual shapes.
❓Do I need to calculate ridge and hip tiles separately from field tiles?
Yes. Ridge, hip, and verge tiles are based on linear length, not roof area, and are different products from field tiles. Calculate and order them separately rather than assuming your wastage buffer covers them.
❓ Why does a color batch mismatch happen, and how do I avoid it?
Tiles are manufactured in production runs, and small variations in raw material or firing conditions create natural color and texture differences between batches. The best way to avoid a mismatch is to order your full quantity — including wastage — upfront, from a single batch.
❓Do different tile materials really need different coverage calculations?
Yes. Coverage rate depends on tile size, shape, and material — concrete tiles are often larger-format with predictable coverage, slate varies by size grade, and clay and composite each have manufacturer-specific rates. Always use the coverage rate for your exact chosen product.
Calculating the right number of roof tiles doesn’t have to feel like guesswork. Once you break it down — measure your actual roof area, adjust for pitch, apply the correct coverage rate for your chosen material, add a realistic wastage allowance, and calculate trim tiles separately — you have a reliable, repeatable method that works for a simple gable roof or a complex custom home.
Getting this number right the first time protects more than your budget. It protects your timeline, keeps your tile color and texture consistent across the whole roof, and saves you from the freight and reorder costs that come with running short. Whether you’re a homeowner planning a new roof or a builder pricing a project, the few extra minutes it takes to calculate carefully — or to have a professional double-check your numbers — is one of the highest-value steps in the entire roofing process.
Get a Free, Custom Tile Estimate from Asian Roof
You now have the same method our technical team uses to calculate tile quantities for real homes. But every roof has its own quirks — shape, climate, and material choice — that can shift the final number.
Talk to the Asian Roof technical team for a free, custom material takeoff. We'll review your roof measurements or plans and provide a precise, order-ready quantity for field tiles, ridge, hip, and verge — helping you order once, order right, and avoid the cost of a second delivery.
Contact Asian Roof for Your Free Estimate →